2022年9月27日 星期二

Angular [ngClass](12)

html部分
<h5 (click)="CountPlus()">ngClass</h5>
<p [ngClass]="{'backsp' : count % 2 == 1}">
  {{count}}
</p>
<p [class.backsp]="count % 2 == 1">
  {{count}}
</p>
ts部分
count = 1;

  CountPlus() {
    this.count++;
 }
css部分
.backsp{
    background-color:aqua;
}
參考資料
1.保哥的Angular 開發實戰:從零開始
2.Angular官網

Angular [ngStyle](11)

html部分
<h5 (click)="CountPlus()">ngStyle</h5>

<p [ngStyle]="{'font-size': (count * 2) + 'px'}">
  {{count}}
</p>
<p [ngStyle]="getStyle()">
  {{count}}
</p>
<p [style.font-size]="(count * 2) + 'px'" [style.color]="'blue'">
  {{count}}
</p>

ts部分
  count = 0;

  CountPlus() {
    this.count++;
  }

  getStyle() {
   return { 'font-size': ( this.count * 2) + 'px' }
  }
參考資料
1.保哥的Angular 開發實戰:從零開始
2.Angular官網

2022年9月22日 星期四

Angular #範本參考變數(Template Reference Variables)(10)

使用在Template中
html部分
  <input type="text" [(ngModel)]="title" #inputTxt />
  <button (click)="ChangeTitle()">點我</button>
  目前文字:{{inputTxt.value}},目前字數:{{inputTxt.value.length}} 
ts部分
  title = "123";
  ChangeTitle() {
    this.title = "被點了";
  }
使用在directive中
承上面程式碼再另外開新增一個Template
然後加入上面的Template
 <app-template-reference-variables #tfvTemp></app-template-reference-variables>
 <button (click)="tfvTemp.title = '被外面的點了'">被外面的點了</button>;
點被外面的點了也可變動原本Template的屬性
參考資料
1.保哥的Angular 開發實戰:從零開始
2.Angular官網

2022年9月19日 星期一

Angular Virtual Studio 2022 ng generate component

Could not find an NgModule. Use the skip-import option to skip importing in NgModule.
因為vs2022如果是開.net core版本會是app.module.ts及app.service.module.ts兩個,所以兩個module以上所以必須指定module
ng g c firstapp --module=app
參考來源
Could not find an NgModule. Use the skip-import option to skip importing in NgModule.
保哥

Angular Virtual Studio 2022 Install Angular CLI

Angular終於可以在Virtual Studio上直接開發不需再使用VS Code
新增專案時有兩種
1.Angular(前端) + .Net Core(後端API)
2.純前端Angular
這時在vs 2022上輸入
ng version
都是沒用的
1.先安裝node.js如果在安裝VS2022時有勾選就可忽略
2.在專案上右鍵 > 在終端機中開啟 > 選擇開發人員命令提示字元 > 輸入
npm install @angular/cli
進行安裝,再輸入ng version有執行表示安裝完成
特別注意以上操作要在ClinetApp底下資料夾

2022年9月14日 星期三

Visual Studio 2022開啟2019出現404

最近使用vs2022開啟2019後跑專案網頁都會出現404,
後來自己測試修改許多地方
最後修改了port後順利執行

2022年8月15日 星期一

ssls.com 憑證流程Windows +DNS驗證(圖示版)

目前憑證效期都只有一年所以會常常用
今天看了上次的做法因沒寫得很仔細,所以又多花了很多時間重新研究
這次做成圖片版的希望明年不用花那麼多時間
下列方法新買的跟舊的均可使用
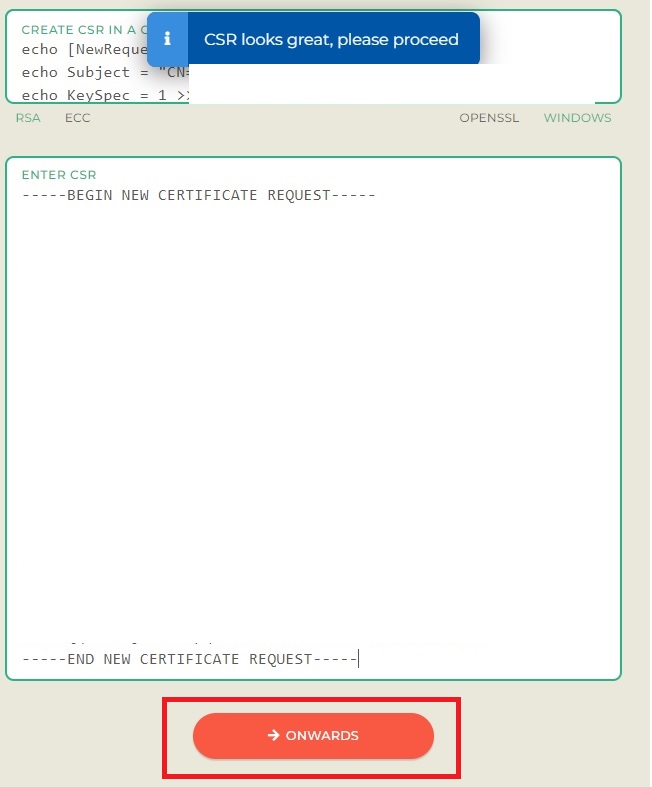
1-1.到ssls.com網站後點選MY SSL至下圖後點選REISSUE(新購買可能不一樣)
1-2.或是點選REACTIVATE(2023新增),操作後直接跳3
2.點選ONWARDS
3.選擇Use my CSR 然後選擇Windows ,將CREATE CSR...內容文字複製起來
4.到主機上打開命令提示字元(CMD)管理員執行,點確定
5.完成後會出現Begin NNEW至END NEW,將內容複製起來
6.回到網頁中貼在ENTER CSR下方框框後點選ONWARDS
7.選擇您的驗證方式,個人覺得EMAIL跟DNS蠻方便的,就看您有哪種權限
8.使用DNS驗證(Create a DNS record),點選上面選MY SSL,點選GET CNAME
9.在自己的DNS上面新增SSLS.com給的值
10.等待驗證秒數
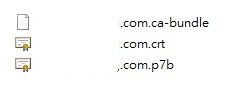
11.下載SSL檔案
12.會有三個檔案ca-bundle、crt、p7b
13.將三個檔案放在主機中,開啟IIS點選伺服器憑證,點選完成憑證要求,選擇.crt檔
14.完成憑證,如果關掉IIS後再開啟憑證,如果消失了代表沒成功可能要重做看看

2022年6月21日 星期二

Javascript 上個月、本月、下個月

參考了網路寫了一個可直接設定第一天跟最後一天
//上個月
$(document).on('click', '#LastMonth', function () {                        
	SetLastAndFirstDate($('#fromdate').val(), -1);
})
//本月
$(document).on('click', '#ThisMonth', function () {            
	SetLastAndFirstDate($('#fromdate').val(), 0);
})
//下個月
$(document).on('click', '#NextMonth', function () {            
	SetLastAndFirstDate($('#fromdate').val(), +1);
})

function SetLastAndFirstDate(nowday, tomonth) {
	var date = new Date(nowday);

	if (tomonth == 0)
		var date = new Date();
	
	var firstDay = new Date(date.getFullYear(), date.getMonth() + (0 + tomonth), 1);
   var lastDay = new Date(date.getFullYear(), date.getMonth() + (1+tomonth), 0);
   $('#fromdate').val(formatDate(firstDay));//設定第一天
   $('#todate').val(formatDate(lastDay));//設定最後一天
   
}       

function formatDate(date) {
	var d = new Date(date),
	month = '' + (d.getMonth() + 1),
	day = '' + d.getDate(),
	year = d.getFullYear();
 	if (month.length < 2)
		month = '0' + month;
	if (day.length < 2)
	day = '0' + day;
	return [year, month, day].join('-');
}
參考來源
Format JavaScript date as yyyy-mm-dd
取得當月第一天和最後一天

2022年2月10日 星期四

c# ViewModel To Model

這方法也是今天才發現
但真的還蠻實用的
如下兩個Class,StaffViewModel繼承了Staff
public class Staff
{
    public int id { get; set; }
    public string name { get; set; }
}

public class StaffViewModel :Staff
{ 
    public int departid { get; set; }
}
如果後端存檔時前端回傳是StaffViewModel但存檔只需要Staff資料
就需要轉換目前網路上看最多人推之一AutoMapper
後來發現如果有繼承關係在時被繼承的List中可直接塞入繼承類別如下
private List<Staff> Merge(List<StaffViewModel> model)
{
     List<Staff> result = new List<Staff>(0);
     foreach (var item in model)
         result.Add(item);
            
     return result;
}       
如果以上不是BUG的話設計時能多用原本存在的方式就能少裝些插件
真的可以省下很多時間減少安裝插件後的問題

2022年1月21日 星期五

c# DirectoryInfo應用

DirectoryInfo di = new DirectoryInfo(@"\\192.168.0.1\old");
//所有檔案列表包含子資料夾
var queryfileall = di.GetFiles("*", SearchOption.AllDirectories);
//指定單一副檔名
var queryfileone = di.GetFiles("*.jpg", SearchOption.AllDirectories);
//指定多重副檔名
string[] extensions = new[] { ".jpg", ".mp3"};
var queryfilemultiple  = di.GetFiles("*", SearchOption.AllDirectories).Where(x => extensions.Contains(x.Extension.ToLower())).ToArray();

//建立資料夾
string newpath =  @"\\192.168.0.1\new";
if (!Directory.Exists(newpath))
{
	Directory.CreateDirectory(newpath);
}
           

foreach (var item in queryfile)
{
	try
   {
   	   //可自行變化...
   	   //複製檔案
		if (!File.Exists(newpath + item.Name))
         item.MoveTo(newpath + item.Name);
   }
   catch (Exception ex)
   {

      throw new Exception(ex.Message);
   }   
}

//方法2
  DirectoryInfo root = new DirectoryInfo(@"\\192.168.0.1\old");
  FileInfo[] files = root.GetFiles();
  foreach (var item in files)
 {}
參考來源
Get multiple files with different extension

2021年11月24日 星期三

Python Django APP(8)

在之前學習裡有語法是新增專案的
django-admin.py startproject website
在Django還有很重要的就是APP,一個專案可由很多APP組成,APP可多個專案互相使用,所以寫出一個好的APP給專案通用是相當重要的
終端機下輸入
python manage.py startapp staff
產生出Staff的APP
接著在Staff下的views.py新增一個function
def staffhello(request,name):         
    return render(request, 'staff_hello.html', {"hello_str": "你好啊{name},這是來自Staff APP!!".format(name=name)})
staff下新增一個templates資料夾,然後再新增一個staff_hello.html
<!DOCTYPE html>
<html>
<head>
    <title>staff_hello</title>    
</head>
<body>
<h1>{{ hello_str }}</h1>
</body>
</html>
修改website底下的urls.py
from staff.views  import  staffhello
urlpatterns = [
    path("staff/<str:name>",staffhello),
]
重點來了上述做完後如果網站跑起來會有錯誤
必須註冊APP
在setting.py中修改
#原本
INSTALLED_APPS = [
    'django.contrib.admin',
    'django.contrib.auth',
    'django.contrib.contenttypes',
    'django.contrib.sessions',
    'django.contrib.messages',
    'django.contrib.staticfiles',
]
#修改後
INSTALLED_APPS = [
    'django.contrib.admin',
    'django.contrib.auth',
    'django.contrib.contenttypes',
    'django.contrib.sessions',
    'django.contrib.messages',
    'django.contrib.staticfiles',
    'staff',
]

2021年11月22日 星期一

Python Django Template 語法(7)

在template中的註解
{# template中的註解寫法單行 #}
{% comment %}
template中的註解寫法多行
{% endcomment %}
if esle
{% if xxx == 5 %}      
{% elif xxx > 4  %} 
{% else %}
{% endif %} 
for迴圈
{% for xxx in result%}   
    {% comment %}      
    以下內容可試看看      
    forloop.counter0
    forloop.counter
    forloop.revcounter
    forloop.revcounter0
    forloop.first
    forloop.last
   {% endcomment %}   
   {{forloop.counter}}
    
{% empty %}
	無資料!!
{% endfor %}

2021年11月18日 星期四

Python Django Template(6)

承上篇路徑跟view已經可以搭配了
但這樣畫面看起來就只有文字
所以要搭配html在瀏覽器上看起來才會比較正常
首先要回到settings.py找到如下
#系統預設
TEMPLATES = [
    {
        'BACKEND': 'django.template.backends.django.DjangoTemplates',
        'DIRS': [],
        'APP_DIRS': True,
        'OPTIONS': {
            'context_processors': [
                'django.template.context_processors.debug',
                'django.template.context_processors.request',
                'django.contrib.auth.context_processors.auth',
                'django.contrib.messages.context_processors.messages',
            ],
        },
    },
]
#修改成
import os
TEMPLATES = [
    {
        'BACKEND': 'django.template.backends.django.DjangoTemplates',
        'DIRS': [os.path.join(BASE_DIR, 'templates').replace('\\', '/')],#templete路徑
        'APP_DIRS': True,
        'OPTIONS': {
            'context_processors': [
                'django.template.context_processors.debug',
                'django.template.context_processors.request',
                'django.contrib.auth.context_processors.auth',
                'django.contrib.messages.context_processors.messages',
            ],
        },
    },
]
新增一個templates的資料夾
在views.py中寫入function來回傳內容
from django.shortcuts import render
def hello(request):
    return render(request, 'hello.html', {"hello_str": "你好啊!!"})
在templates的資料夾中新增一個hello.html
內容自訂主要使用h1標籤來看是否有套版
<!DOCTYPE html>
<html>
<head>
    <title>您好套版</title>    
</head>
<body>
<h1>{{ hello_str }}</h1>
</body>
</html>
urls.py修改
urlpatterns = [   
    path("hello/",hello),
]
接著瀏覽器輸入
http://127.0.0.1:8000/hello
參考來源
Templates · Django Girls 學習指南

Python Django urls .py and views.py(5)

這次練習urls.py
urls.py可指定目前所有連結但需配合著views.py(可自取名字)來顯示
在website資料夾下建立一個views.py
在view.py中寫入function來回傳內容
from django.http import HttpResponse
def home(request):
      return HttpResponse("yes this is your home success!")
接著修改urls.py內容
#原本
from django.contrib import admin
from django.urls import path
urlpatterns = [
     path("admin/", admin.site.urls),
]
#修改後
from django.contrib import admin
from django.urls import path
from website.views import home #要import進來
urlpatterns = [
    #path("admin/", admin.site.urls),
    path("homexx/", home), #(網頁路徑,function)
]
接著瀏覽器輸入
http://127.0.0.1:8000/homexx/
更進階一點views.py加入
def yourinfo(request,name, age):
    return HttpResponse("您的名字{name},您的年齡{age}".format(name = name ,age = age))
修改urls.py
from website.views import home,yourinfo #要import進來
urlpatterns = [
    path("homexx/", home), 
    path("yourinfo/<str:name>/<int:age>",yourinfo),
]
接著瀏覽器輸入
http://127.0.0.1:8000/yourinfo/陳00/35

Python Django settings.py(4)

承上篇建置Django網站後會產生幾個檔
本篇大約簡單說明settings.py裡幾個比較常會使改到的
更進階後面會依文章需求補上
#這個開發時可True,正式發布時請一定要改False
DEBUG = True
#預設語言為en-us
#後期版本已經沒有zh-TW了請使用zh-hant(漢字繁體) or zh-hans(漢字簡體)
LANGUAGE_CODE = 'zh-hant'
多國語言可參考Using Language Identifiers (RFC 3066)
#系統時區預設UTC
TIME_ZONE = 'Asia/Taipei'
時區可參考List of tz database time zones

2021年11月17日 星期三

Python Django 建置專案(3)

終端機下輸入
django-admin.py startproject website
產生如下圖目錄及檔案代表完成
本機啟動網站,終端機下輸入
cd website
python manage.py runserver
開啟瀏覽器查看是否成功
http://127.0.0.1:8000/

Python 安裝套件pip Django(2)

開啟VS Code 新增終端機

#安裝pip(以後套件都可以使用pip安裝即可)
python -m pip install -U pip

#查看目前已安裝套件
pip list

#安裝套件目前是3.2.9
pip install Django

#移除套件
pip uninstall Django

#安裝套件更新
python -m pip install -U Django

相關可安裝套件可參考pip的官網

Python 開發環境(1)

紀錄學習使用Python Django架站
作業系統Windows 10
開發軟體PythonVisual Studio Code基本上下一步安裝到底,只有Add Python To Path要打勾
Python初階語法學習推薦GrandmaCan -我阿嬤都會【python】4小時初學者Python教學有點底子看完應該就會
未來幾篇Django均以It’s Django - 用Python迅速打造Web應用這本書學習

2021年9月6日 星期一

.Net Core FluentValidation 一個Model多個驗證方式

.Net Core驗證方式FluentValidation通常都會用以下方式
新增一個Validator Class,撰寫驗證要輸入的欄位
public XXXValidator()
{      
  RuleFor(x => x.xxxfiled).NotEmpty().WithMessage("請輸入欄位");          
}

DI注入Service
services.AddTransient<IValidator<AAAViewModel>, XXXValidator>();         

然後前端驗證
FluentValidation.Results.ValidationResult vResult = this._xxxValidator.Validate(model);
if (!vResult.IsValid)
{
  throw new Exception(Function_ModelStateError.FormatToString(vResult));
}        

但是如果有另一個Service也是要用AAAViewModel但是驗證的欄位不一樣呢?
先新增一個Class如下
//來源https://stackoverflow.com/questions/11607476/two-validators-for-one-model
public static class ValidationExtensions
{
     public static FluentValidation.Results.ValidationResult ValidateModel<TModel, TValidator>(this TModel model, TValidator validator, ModelStateDictionary modelState)
         where TModel : class
         where TValidator : AbstractValidator<TModel>
     {
         var result = validator.Validate(model);
         return result;
     }
}

新增另一個Validator Class,撰寫驗證要輸入的欄位
public YYYValidator()
{      
  RuleFor(x => x.yyyfiled).NotEmpty().WithMessage("請輸入欄位");          
}

DI注入另一個Service
services.AddTransient<IValidator<AAAViewModel>, YYYValidator>();         

然後前端驗證
FluentValidation.Results.ValidationResult vResult = model.ValidateModel(new YYYValidator(), ModelState);//修改這
if (!vResult.IsValid)
{
  throw new Exception(Function_ModelStateError.FormatToString(vResult));
}        

參考來源
Two Validators for one Models

2021年8月6日 星期五

c# Linq Filter Detail(Labdba string array Like)

常常忘記這語法所以來記錄一下
情境個人資料內有許多經歷或是學歷
某天人資部需求想撈出那些人是碩士及博士
通常資料表會這樣開
員工資料主檔
public class Staff
{
	public int StaffId { get; set; }
	public string Name { get; set; }
	public List EducationList { get; set; }//多種學歷	
}
學歷檔
public class Education
{
	public int EducationId { get; set; }
	public int EducationType { get; set; }//假設有另一個資料表紀錄ID的意思 碩士是6 博士是7
	public string SchoolName { get; set; }
}
抓取過濾碩士博士
int[] filter = new int[] { 6, 7 };
result = result.Where(x => x.EducationList.Any(y => filter.Contains(y.EducationType))).ToList();
string[] filter = searchTxt.Split(',' , ' ');               
var result = data.Where(x => temp.Any(s => x.text.Contains(s)  || x.content.Contains(s))).ToList();
備注用額外Detail符合的筆數
  int mIsCondition = data.Sum(x => x.detail.Where(y => y.iscondition).Count());