今天看了上次的做法因沒寫得很仔細,所以又多花了很多時間重新研究
這次做成圖片版的希望明年不用花那麼多時間
下列方法新買的跟舊的均可使用
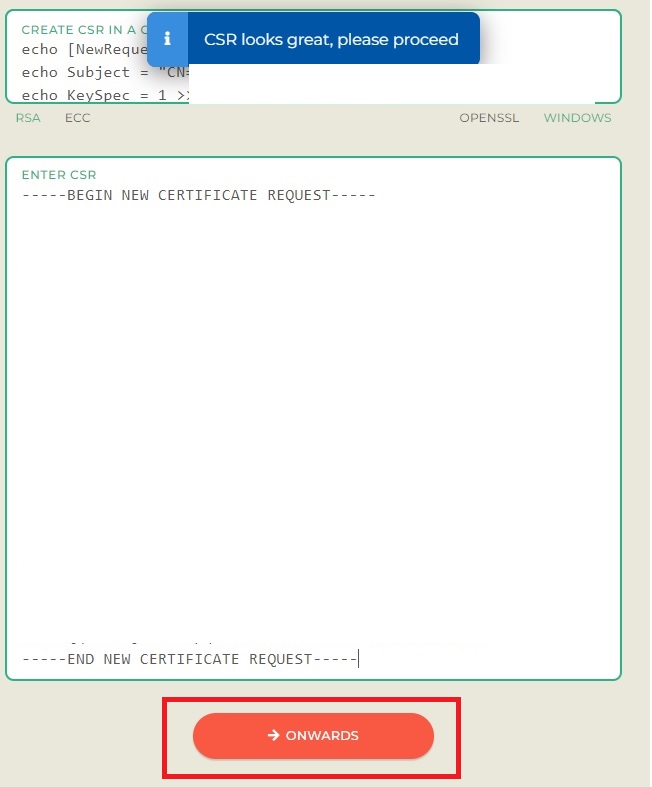
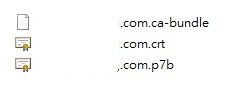
1-1.到ssls.com網站後點選MY SSL至下圖後點選REISSUE(新購買可能不一樣)






//上個月
$(document).on('click', '#LastMonth', function () {
	SetLastAndFirstDate($('#fromdate').val(), -1);
})
//本月
$(document).on('click', '#ThisMonth', function () {
	SetLastAndFirstDate($('#fromdate').val(), 0);
})
//下個月
$(document).on('click', '#NextMonth', function () {
	SetLastAndFirstDate($('#fromdate').val(), +1);
})

function SetLastAndFirstDate(nowday, tomonth) {
	var date = new Date(nowday);

	if (tomonth == 0)
		var date = new Date();

	var firstDay = new Date(date.getFullYear(), date.getMonth() + (0 + tomonth), 1);
   var lastDay = new Date(date.getFullYear(), date.getMonth() + (1+tomonth), 0);
   $('#fromdate').val(formatDate(firstDay));//設定第一天
   $('#todate').val(formatDate(lastDay));//設定最後一天

}

function formatDate(date) {
	var d = new Date(date),
	month = '' + (d.getMonth() + 1),
	day = '' + d.getDate(),
	year = d.getFullYear();
 	if (month.length < 2)
		month = '0' + month;
	if (day.length < 2)
	day = '0' + day;
	return [year, month, day].join('-');
}
參考來源
public class Staff
{
    public int id { get; set; }
    public string name { get; set; }
}

public class StaffViewModel :Staff
{
    public int departid { get; set; }
}
如果後端存檔時前端回傳是StaffViewModel但存檔只需要Staff資料
private List<Staff> Merge(List<StaffViewModel> model)
{
     List<Staff> result = new List<Staff>(0);
     foreach (var item in model)
         result.Add(item);

     return result;
}
如果以上不是BUG的話設計時能多用原本存在的方式就能少裝些插件
DirectoryInfo di = new DirectoryInfo(@"\\192.168.0.1\old");
//所有檔案列表包含子資料夾
var queryfileall = di.GetFiles("*", SearchOption.AllDirectories);
//指定單一副檔名
var queryfileone = di.GetFiles("*.jpg", SearchOption.AllDirectories);
//指定多重副檔名
string[] extensions = new[] { ".jpg", ".mp3"};
var queryfilemultiple  = di.GetFiles("*", SearchOption.AllDirectories).Where(x => extensions.Contains(x.Extension.ToLower())).ToArray();

//建立資料夾
string newpath =  @"\\192.168.0.1\new";
if (!Directory.Exists(newpath))
{
	Directory.CreateDirectory(newpath);
}


foreach (var item in queryfile)
{
	try
   {
   	   //可自行變化...
   	   //複製檔案
		if (!File.Exists(newpath + item.Name))
         item.MoveTo(newpath + item.Name);
   }
   catch (Exception ex)
   {

      throw new Exception(ex.Message);
   }
}

//方法2
  DirectoryInfo root = new DirectoryInfo(@"\\192.168.0.1\old");
  FileInfo[] files = root.GetFiles();
  foreach (var item in files)
 {}
參考來源
django-admin.py startproject website在Django還有很重要的就是APP,一個專案可由很多APP組成,APP可多個專案互相使用,所以寫出一個好的APP給專案通用是相當重要的
python manage.py startapp staff產生出Staff的APP

def staffhello(request,name):
    return render(request, 'staff_hello.html', {"hello_str": "你好啊{name},這是來自Staff APP!!".format(name=name)})
staff下新增一個templates資料夾,然後再新增一個staff_hello.html
<!DOCTYPE html>
<html>
<head>
    <title>staff_hello</title>
</head>
<body>
<h1>{{ hello_str }}</h1>
</body>
</html>
修改website底下的urls.py
from staff.views  import  staffhello
urlpatterns = [
    path("staff/<str:name>",staffhello),
]
重點來了上述做完後如果網站跑起來會有錯誤
#原本
INSTALLED_APPS = [
    'django.contrib.admin',
    'django.contrib.auth',
    'django.contrib.contenttypes',
    'django.contrib.sessions',
    'django.contrib.messages',
    'django.contrib.staticfiles',
]
#修改後
INSTALLED_APPS = [
    'django.contrib.admin',
    'django.contrib.auth',
    'django.contrib.contenttypes',
    'django.contrib.sessions',
    'django.contrib.messages',
    'django.contrib.staticfiles',
    'staff',
]

{# template中的註解寫法單行 #}
{% comment %}
template中的註解寫法多行
{% endcomment %}
if esle
{% if xxx == 5 %}
{% elif xxx > 4  %}
{% else %}
{% endif %}
for迴圈
{% for xxx in result%}
    {% comment %}
    以下內容可試看看
    forloop.counter0
    forloop.counter
    forloop.revcounter
    forloop.revcounter0
    forloop.first
    forloop.last
   {% endcomment %}
   {{forloop.counter}}

{% empty %}
	無資料!!
{% endfor %}
#系統預設
TEMPLATES = [
    {
        'BACKEND': 'django.template.backends.django.DjangoTemplates',
        'DIRS': [],
        'APP_DIRS': True,
        'OPTIONS': {
            'context_processors': [
                'django.template.context_processors.debug',
                'django.template.context_processors.request',
                'django.contrib.auth.context_processors.auth',
                'django.contrib.messages.context_processors.messages',
            ],
        },
    },
]
#修改成
import os
TEMPLATES = [
    {
        'BACKEND': 'django.template.backends.django.DjangoTemplates',
        'DIRS': [os.path.join(BASE_DIR, 'templates').replace('\\', '/')],#templete路徑
        'APP_DIRS': True,
        'OPTIONS': {
            'context_processors': [
                'django.template.context_processors.debug',
                'django.template.context_processors.request',
                'django.contrib.auth.context_processors.auth',
                'django.contrib.messages.context_processors.messages',
            ],
        },
    },
]
新增一個templates的資料夾
from django.shortcuts import render
def hello(request):
    return render(request, 'hello.html', {"hello_str": "你好啊!!"})
在templates的資料夾中新增一個hello.html
<!DOCTYPE html>
<html>
<head>
    <title>您好套版</title>
</head>
<body>
<h1>{{ hello_str }}</h1>
</body>
</html>
urls.py修改
urlpatterns = [
    path("hello/",hello),
]
接著瀏覽器輸入

from django.http import HttpResponse
def home(request):
      return HttpResponse("yes this is your home success!")
接著修改urls.py內容
#原本
from django.contrib import admin
from django.urls import path
urlpatterns = [
     path("admin/", admin.site.urls),
]
#修改後
from django.contrib import admin
from django.urls import path
from website.views import home #要import進來
urlpatterns = [
    #path("admin/", admin.site.urls),
    path("homexx/", home), #(網頁路徑,function)
]
接著瀏覽器輸入
def yourinfo(request,name, age):
    return HttpResponse("您的名字{name},您的年齡{age}".format(name = name ,age = age))
修改urls.py
from website.views import home,yourinfo #要import進來
urlpatterns = [
    path("homexx/", home),
    path("yourinfo/<str:name>/<int:age>",yourinfo),
]
接著瀏覽器輸入
#這個開發時可True,正式發布時請一定要改False
DEBUG = True
#預設語言為en-us #後期版本已經沒有zh-TW了請使用zh-hant(漢字繁體) or zh-hans(漢字簡體) LANGUAGE_CODE = 'zh-hant'多國語言可參考Using Language Identifiers (RFC 3066)
#系統時區預設UTC TIME_ZONE = 'Asia/Taipei'時區可參考List of tz database time zones
django-admin.py startproject website產生如下圖目錄及檔案代表完成

cd website
python manage.py runserver
開啟瀏覽器查看是否成功

#安裝pip(以後套件都可以使用pip安裝即可)
python -m pip install -U pip

#查看目前已安裝套件
pip list

#安裝套件目前是3.2.9
pip install Django

#移除套件
pip uninstall Django

#安裝套件更新
python -m pip install -U Django
public XXXValidator()
{
  RuleFor(x => x.xxxfiled).NotEmpty().WithMessage("請輸入欄位");
}
services.AddTransient<IValidator<AAAViewModel>, XXXValidator>();
FluentValidation.Results.ValidationResult vResult = this._xxxValidator.Validate(model);
if (!vResult.IsValid)
{
  throw new Exception(Function_ModelStateError.FormatToString(vResult));
}
//來源https://stackoverflow.com/questions/11607476/two-validators-for-one-model
public static class ValidationExtensions
{
     public static FluentValidation.Results.ValidationResult ValidateModel<TModel, TValidator>(this TModel model, TValidator validator, ModelStateDictionary modelState)
         where TModel : class
         where TValidator : AbstractValidator<TModel>
     {
         var result = validator.Validate(model);
         return result;
     }
}
public YYYValidator()
{
  RuleFor(x => x.yyyfiled).NotEmpty().WithMessage("請輸入欄位");
}
services.AddTransient<IValidator<AAAViewModel>, YYYValidator>();
FluentValidation.Results.ValidationResult vResult = model.ValidateModel(new YYYValidator(), ModelState);//修改這
if (!vResult.IsValid)
{
  throw new Exception(Function_ModelStateError.FormatToString(vResult));
}
public class Staff
{
	public int StaffId { get; set; }
	public string Name { get; set; }
	public List EducationList { get; set; }//多種學歷
}
學歷檔
public class Education
{
	public int EducationId { get; set; }
	public int EducationType { get; set; }//假設有另一個資料表紀錄ID的意思 碩士是6 博士是7
	public string SchoolName { get; set; }
}
抓取過濾碩士博士
int[] filter = new int[] { 6, 7 };
result = result.Where(x => x.EducationList.Any(y => filter.Contains(y.EducationType))).ToList();
string[] filter = searchTxt.Split(',' , ' ');
var result = data.Where(x => temp.Any(s => x.text.Contains(s)  || x.content.Contains(s))).ToList();
備注用額外Detail符合的筆數
int mIsCondition = data.Sum(x => x.detail.Where(y => y.iscondition).Count());


Uncaught TypeError: Bootstrap's dropdowns require Popper.js collapse.js:363 Uncaught TypeError: u is not a constructor缺少了Popper.js檔可至cdn下載所需的但目前版本v2.x以上好像也不行
<form enctype="multipart/form-data" method="post" asp-controller="FileStream" asp-action="Upload">
    多選檔案:<input type="file" name="File" multiple  />    <input type="submit" value="上傳" />
</form>
Controller
private IWebHostEnvironment _hostingEnvironment;
private readonly IFunction_Error _functionerror;
public FileStreamController(IWebHostEnvironment environment, IFunction_Error functionerror)
{
  _hostingEnvironment = environment;
}
public IActionResult Index()
{
  return View();
}

[HttpPost]
public async Task<IActionResult> Upload(List<IFormFile> file)
{
  string uploadfolder = Path.Combine(_hostingEnvironment.WebRootPath, "files");
  foreach (IFormFile item in file)
  {
   if (item.Length > 0)
   {
     string filePath = Path.Combine(uploadfolder, item.FileName);
     using (Stream fileStream = new FileStream(filePath, FileMode.Create))
     {
       await item.CopyToAsync(fileStream);
     }
   }
  }
 return View();
 }
Ok很簡單吧
 serverOptions.Limits.MaxRequestBodySize = long.MaxValue;
 ...
services.Configure(options =>
{
  options.MultipartBodyLengthLimit = long.MaxValue;
  ....
});
[DisableRequestSizeLimit]以上三種都沒用最後註解掉
<?xml version="1.0" encoding="utf-8"?>
<configuration>
  <system.webServer>
    <security>
      <requestFiltering>
        <requestLimits maxAllowedContentLength="2147483647" />
      </requestFiltering>
    </security>
  </system.webServer>
</configuration>
User說:剛剛上傳了150MB的檔案都沒出現錯誤但檔案又沒傳上去services.Configure注意上面的MaxValue要修正阿不要真的那麼大還是要依專案來設定(options => { options.BufferBodyLengthLimit = long.MaxValue; options.KeyLengthLimit = int.MaxValue; options.MultipartBodyLengthLimit = long.MaxValue; options.MultipartBoundaryLengthLimit = int.MaxValue; options.ValueCountLimit = int.MaxValue; options.ValueLengthLimit = int.MaxValue; });

docker build -t samplecore .可改成
docker build -t samplecore:1.0 .

指令 Image ID REPOSITORY:TAG
docker image tag  4c575b75980e officialcore:2.0

先查看目前
docker images

指令 目的端 REPOSITORY:TAG
docker save -o d:\temp\samplecore.tar samplecore:latest

指令 來源端
docker load -i d:\temp\samplecore.tar


FROM mcr.microsoft.com/dotnet/core/sdk:3.1 AS build
WORKDIR app

# copy csproj and restore as distinct layers
COPY *.sln .
COPY coresample.language/*.csproj ./coresample.language/
COPY coresample.model/*.csproj ./coresample.model/
COPY coresample.service/*.csproj ./coresample.service/
COPY coresample.web/*.csproj ./coresample.web/

# copy everything else and build app
COPY coresample.language/. ./coresample.language/
COPY coresample.model/. ./coresample.model/
COPY coresample.service/. ./coresample.service/
COPY coresample.web/. ./coresample.web/
RUN dotnet publish -c Release -o out

FROM mcr.microsoft.com/dotnet/core/aspnet:3.1 AS runtime
ENV ASPNETCORE_URLS=http://+:8080
WORKDIR /app
EXPOSE 8080/tcp
COPY --from=build /app .
ENTRYPOINT ["dotnet", "coresample.web.dll"]
2022-08-31補充vs2022在專案 > 右鍵 > 加入 > Docker支援也可跑出上述功能
docker build -t samplecore .
中間略...
Successfully built da35a45ea2bf
Successfully tagged samplecore:latest
開啟軟體Docker Desktop
指令 名稱 port 來源image
docker run -d  --name=MyFistApp -p 8081:80  samplecore:latest


